

Java singleton class for Android Before we get into an example, it’s important to understand what a singleton design pattern is. A singleton is a design pattern that allows only one instance of a class to be created. It can be used to manage concurrency and provide a central point of access for programs to connect to the database storage.
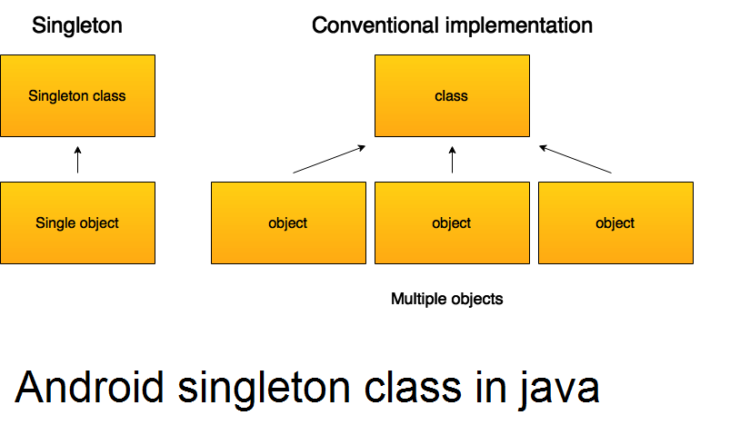
A singleton class in object-oriented programming is one that can only have one object (an instance) at a time. If we try to build this Singleton class after the first attempt, the newly created variable will likewise point to the original instance that was created. As a result, any changes made to any variable in the class affect the variable for the single instance created in some way. If we try to link to that variable with any variable belonging to the class type, we’ll see this.
When you define a class as a one-ton class, keep the following factors in mind:
- Create a private function Object() { [native code] }
- Create a static method for return types from the singleton class that uses an object. The concept of lazy initialization is used to generate the static procedure in this scenario.
The singleton class serves a specific function
The main goal of Single classes is to limit the number of objects that can be created to only one. This is frequently done to guarantee that access to resources, such as socket or database connections, is controlled.
Because singleton classes limit the production of instances, the loss of memory space cannot be attributed to their use. Objects are only produced once, rather than every time a new request is received because they are only created once.
In compliance with the standards, this single object can be used in numerous instances. This is why singleton patterns in Java are commonly used in multi-threaded databases and database applications. In Java, a singleton model is used for caching, logging, thread pooling, establishing settings, and more.
For example, if we have permission to only have one database connection, or if our JDBC driver doesn’t allow us to use multithreading, the Singleton class comes into play to ensure that only one connection or thread can connect to the database at any given moment.
In Java, how do you design/create a Singleton Class?
You must follow the instructions below to create a singleton class:
- Ensure that there is only one instance of this class.
- Give the instance global access.
- This class’ constructors are all private.
- Providing a static method that returns the object’s reference. Static methods are written using the lazy initialization concept.
- A private variable is created for the instance.
The Runtime class, Action Serverlet, and Service Locator are all singleton classes. Class singleton additionally has factory methods and private constructors.
The distinction between the Normal and Singleton Classes
The method used to instantiate objects of the Singleton class might be used to differentiate it from other classes. A java function Object() { [native code] } is used to create a standard class. We can use the method of getting an instance() to instantiate the singleton class, but not the method of getting an instance() to instantiate the singleton class.
The other contrast is that a regular class disappears at the end of the application’s lifecycle, whereas a singleton class does not.
Singleton Class Pattern Types
Singleton pattern design can be divided into two categories:
- Initiation as soon as possible The object’s construction takes place during the loading process.
- Lazy Instantiation is a term that refers to the process of creating anything The object’s creation is carried out in accordance with the specifications.
In Android 1, this example demonstrates how to use the singleton class. Create a completely new project in Android Studio by going to File > Create a New Project and filling in all of the relevant information.
2 – In res/layout/activity main.xml, add the following code.
<?xml version = "1.0" encoding = "utf-8"?>
<LinearLayout
   xmlns:android = "http://schemas.android.com/apk/res/android"
   xmlns:tools = "http://schemas.android.com/tools"
   android:layout_width = "match_parent"
   android:layout_height = "match_parent"
   tools:context = ".MainActivity"
   android:orientation = "vertical">
   <EditText
      android:id = "@+id/Value_editText"
      android:layout_width = "match_parent"
      android:layout_height = "wrap_content"
      android:hint = "Enter Your vlaue " />
   <Button
      android:id = "@+id/saveBtn"
      android:text = "Save"
      android:layout_width = "wrap_content"
      android:layout_height = "wrap_content" />
</LinearLayout>
We used edit Ext and a button in the code above. When the user hits the button in the preceding code, data from the edit text is extracted and saved in a separate class, and values from the singleton class are displayed in a toast.
3 – In src/MainActivity.java, add the following code.
public class MainActivity extends AppCompatActivity {
   EditText editText;
   Button saveBTn;
   @Override
   protected void onCreate(Bundle savedInstanceState) {
      super.onCreate(savedInstanceState);
      setContentView(R.layout.activity_main);
      editText = findViewById(R.id.Value_editText);
      saveBTn= findViewById(R.id.saveBtn);
      saveBTn.setOnClickListener(new View.OnClickListener() {
         @Override
         public void onClick(View v) {
            if(editText.getText().toString().isEmpty()) {
               editText.setError("Enter your value");
            }else{
               String editValue = editText.getText().toString();
               singleTonExample singletonexample = singleTonExample.getInstance();
               singletonexample.setText(editValue);
               Toast.makeText(MainActivity.this,singletonexample.getText(),Toast.LENGTH_LONG).show();
            }
         }
      });
   }
}
4–Create a SingleTon Class
public class singleTonExample {
   String editValue;
   private static final singleTonExample ourInstance = new singleTonExample();
   public static singleTonExample getInstance() {
      return ourInstance;
   }
   private singleTonExample() { }
   public void setText(String editValue) {
      this.editValue = editValue;
   }
   public String getText() {
      return editValue;
   }
}
Conclusion:
Let’s put your app to the test. It’s expected that you’ve already linked your Android device to your computer. To run the app in Android Studio, open the project’s activity files and then select the Run icon from the toolbar. Choose your cell phone as an option, then confirm your device. This will take you to your home screen.