

Virtual memory is a Windows operating system feature that allows the system to access and utilize disc space on physical drives as if it were memory (RAM) to temporarily store data while you’re using your computer. If you receive a High Memory Usage problem on Windows 11, you must adjust the Virtual Memory Size.
What is Virtual Memory, and how does it work?
The Windows operating system refers to virtual memory as virtual RAM stored on the hard disc. When there is a lot of memory utilization, it will be used momentarily. This technique allows you to have a huge memory area in a computer with a modest RAM size, allowing you to execute large applications or numerous programs at the same time (mostly less than 4GB).
What causes Windows 11 to use so much memory?
High memory utilization can be caused by a multitude of factors. If you’re experiencing latency or freezing, it’s most likely due to a large amount of RAM being used. It can also be triggered by a number of programs operating in the background.
How Do I Know If My Computer Has Enough Memory?
To open Windows Task Manager, press the ‘Ctrl+Shift+Esc’ key on your keyboard. You can also right-click the taskbar at the bottom of your screen and select the ‘Task Manager’ option from the context menu. Click the ‘Performance’ tab in Windows Task Manager after it has appeared. On the top of the window, you’ll notice a graph of CPU and Memory Usage.
Let’s look at how to modify the size of virtual memory in Windows 11.
How can I change the size of virtual memory in Windows 11?
- Open settings from the start menu or by pressing Windows+I at the same time.
- From the left sidebar, select “System.”
- Click on “About” and then “Advanced System Settings” under “System.”

- Click on “settings” under the performance section.
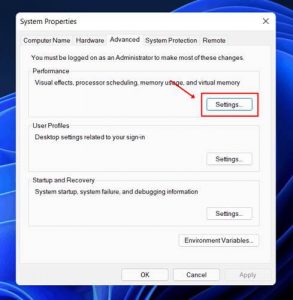
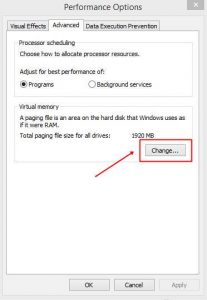
- Switch to the “Advanced tab” now.
- You’ll locate the virtual memory area there, and you’ll need to select “modify” from the drop-down menu.
- Automatically manage paging file size for all drives” is the default configuration.
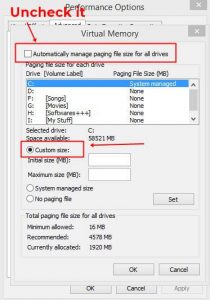


Untick the box. After that, you must choose the partition and then the custom size option.
- Input the size in megabytes, click “Set,” then “OK” and restart your computer.
- Your computer’s system will be adjusted for greater performance after it restarts.
The high memory consumption issue, as well as program crashing, lagging, and freezing, can be resolved by changing the Virtual memory size. If you want to go back to the previous settings, select “automatically manage paging file size for all drives” and then set and restart your system.
Note: If you don’t have enough memory, don’t set the memory size too high. This will slow down or potentially crash your computer.
It was all about increasing page file size or altering virtual memory size in Windows 11, and the article will undoubtedly be useful to people who are experiencing high memory usage and wish to change the virtual memory size in Windows 11.
Conclusion:
This article has discussed the procedure to Change the Size of Virtual Memory in Windows 11. You can use this method to apply changes to your Windows Operating System. Don’t forget to send us your suggestions and feedback. Goodbye!